
Cornwall's Town Hall was a buzz a few Saturdays ago with Motherhouse's Honey Bee Mine Workshop. It was great to have so many new or soon to be beekeepers together in one big room; this workshop was full for weeks in advance and continues to be one of the most popular in the
Old Style Life Skills Series. Good news also that the
Obama family is joining the growing ranks of Americans engaged in backyard beekeeping and including two bee hives in the organic garden at the White House!


Debra Tyler, with assistance from Chris Hopkins, led the workshop. Here Chris is demonstrating how to fire up a smoker. He put a little paper, twigs, green grass, sumac, and some burlap in the smoker. One participant suggested adding an ice cube and we all thought that was a good idea.
Most beekeepers use smokers
to blow smoke into a beehive before inspecting or handling the hive. Under normal circumstances if a beehive is approached i.e. threatened, the guard bees will release a pheromone that alerts the bees in the hive to defend the hive by attacking the intruder. When smoke is blown into the hive first, however, the guard bees' receptors are dulled and they do not sound this alarm. The smoke also has a secondary effect in that it initiates a feeding response in anticipation of possibly having to abandon the hive due to fire.
This feeding has a tendency to calm the bees. Smoke, we learned, is one thing a beekeeper can use when working with bees.
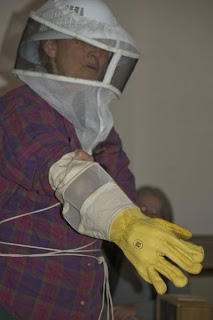
Wearing protective clothing is another. Here, Debra is wearing gloves, a hat, and a veil. Sometimes experienced beekeepers do not wear gloves because they are cumbersome. The face and neck are the most important areas to protect, so most beekeepers at least wear a veil.

Many resources were available to browse through at the workshop and everyone went home with a copy of Debra's
Working The Hive, a beautifully hand-drawn, hand-bound, fold-out hexagonal book that can be colored with
Beeswax Crayons. For fascinating reading on honeybees, I recommend
The Queen Must Die And Other Affairs of Bees and Men by William Longgood, of which he says - This book is not intended as a work of science or a manual on beekeeping. It is an effort to capture some of the mystery and poetry that I have observed in bees, and to enlarge our conception of the importance, beauty, and universality of all life.


It's important to have a hive set up before getting bees. A hive is a set of rectangular wooden boxes which can be opened at the top and which are filled with move-able wood or plastic frames. Each frame holds a sheet of wax or plastic foundation. The bees build cells upon the sheets of foundation to create complete honeycombs. The bottom box, or brood chamber, contains the queen and most of the bees; the upper boxes, or supers, will eventually contain just honey. At the workshop some participants put together frames.
Situate the hive in a good spot. Debra suggested having the hive face south or southeast so that in winter the sun will warm it. A water source nearby and shelter to the north or northwest are other considerations.

Here Debra has a frame in which she has cut the foundation wax. She does this, she explained, as if to say to the bees, please fill this frame for me. She wants to let the bees do their job, their work. By setting up the frame like this, the foundation wax is just a suggestion to the bees of where you would like them to build their comb.

Debra described a few ways of getting bees for your hive. One is to order a package of bees and at the workshop we looked at such a package. It is also possible to get a Nuc, or Nucleus Colony, a small honey bee colony, 5 frames, created from a larger colony. The term Nuc refers both to the smaller size box and the colony of honeybees within it. The name is derived from the fact that a nuc hive is centered around a queen - the nucleus of the honey bee colony. Debra suggested calling Chris Harp,
HoneyBeeLives, in New Patlz, NY about Nucs.

Rarely is there any honey available in the first year of beekeeping, Debra explained, and even if there is some, she never takes it, leaving it for the bees during the coming winter. In subsequent years, she leaves one deep super and one shallow one of honey for the bees and extracts the rest. Above is a demonstration of how honey can be collected with this extractor, which works by centrifugal force.


Bees not only make honey, but beeswax; and after learning about beekeeping and having lunch, some people stayed to dip and roll candles.
Bees also play an important role in our environment. They help distribute pollen among various flowering plants, which leads to pollination. Bees are responsible for pollinating nearly 80 percent of all the fruits and vegetables we eat!
Motherhouse Market contains resources for
Hands On/Bee-ginning with Bees, including a
Honeybee Plant List for the Northeast compiled by Grai Rice/HoneybeeLives, a
Bee Tea Recipe that helps strengthen the bee's immune system, information about
Better Bee, Beekeepers serving Beekeepers, a short video
Call of the Honeybees to watch, and
more.
During lunch, Debra read a verse entitled Short Course, written by Michael Goldman, a fellow participant in a beekeeping workshop she attended, and his words are what I leave you with -
Recall the honeybee's source in Spirit. Be calm in their mystery. Provide their natural circumstances as best you can. Allow their natural tendencies to emerge. Refrain from manipulating them. Keep selfish ends in check. They are connected to all things.
 Sure enough, by Saturday evening my new starter was bubbling away and filling up the jar I had brought it home in, just as Angela had said it would at Motherhouse's OSLSS Sourdough Starter Course. When I say new, I only mean new to me, Angela told us the starters we were taking home were descendants of a starter that began over 250 years ago!
 Dr. Angela Greco, a verternarian, led this workshop for Motherhouse and will be leading two more Old Style Life Skills Series workshops this year - Jam Session and The Whey of Cheesemaking. For descriptions of these workshops, visit the Motherhouse web site.
  By the time you finish reading this post, you will see just how many ways you can use sourdough! This versatility is exactly what Angela set out to show us at the workshop. We made two different breads, pancakes and also pretzels at the workshop. In addition Angela brought a Sourdough Chocolate Cake she had made the day before to the workshop. This was the piece de resistance!
 As families arrived for the workshop, equipped with bowls and jars and baking sheets, they settled in and then started grinding wheat berries, enough to yield the whole wheat flour needed for the two breads we were making at the workshop. Three different grain mills were set up for this purpose and everyone had a lot of fun doing this.
 All the recipes we followed at the workshop were adapted from the Storey Country Wisdom Bulletin, "Baking with Sourdough". Everyone went home with a copy of this book which contains basic procedures for using sourdough as well as many recipes.
 We mixed ingredients together to make a Sourdough Bread with Whole Wheat and a Molasses Rye Sourdough Bread.
 We obtained the appropriate amount of sourdough sponge from Angela, started the night before. The sponge contained the starter, white flour, oil, honey, and warm water; making a sponge and allowing it to ferment is a necessary step if you are baking a kneaded bread. It is also an example of how using sourdough takes some planning ahead. For the workshop, Angela did all the planning i.e. giving the sourdough time to grow and work as a leavener. At home, using sourdough means planning and beginning the baking process further ahead of time than you would if you were using yeast or baking powder.
 When we had the sourdough sponge mixed in, we stirred in enough white flour to make a dough we could handle. We formed the dough for each bread into a ball and covered with a damp cloth and let rest for about 15 minutes. Then, we kneaded until smooth and elastic.
 And here are the two breads everyone took home for baking. There are few aromas more wonderful than the smell of home baked bread!
 The Old Fashioned Pancakes were light, fluffy, and delicious! When I said so to Angela, she said "that's because they're alive..." and indeed using sourdough starter in the recipe makes a difference!

 Here we are rolling and shaping pieces of the Sourdough Pretzel dough into long ropes, then twisting the ropes into pretzel shapes.
 We brushed the pretzels with a mixture of beaten egg yolk and cream before covering with a damp cloth to let rise. After rising, we brushed the pretzels with the egg mixture again and sprinkled with salt. Notice all the different pretzel shapes!
 The pretzels were baked for just 15 minutes in a preheated oven and allowed to cool before eating. They were absolutely delicious and although this is not the best photo, you can see what they were like.
 Before leaving, Angela told us how to feed and keep a starter. A starter has to be fed with the same amounts of flour and water you take out on a weekly basis. You can use the starter to make bread, or give away to a friend, or discard. The idea is to maintain approximately the same amount of starter all the time, although it is also possible to expand your starter. Here's to the fun, challenge, and good taste of sourdough!


