Showing posts with label chicken. Show all posts

Saturday, June 9, 2012

Miss Marie's EGGS-perience


Miss Marie came to our workshop because she hopes to keep her own laying hens someday. She saw a variety of ways to house, feed and water chickens but chose not to participate in harvesting a broiler to take home. She wrote: I am glad I took your class, even if i could not take a chickens life, it gave me an appreciation for the process of obtaining meat that I had not had before. thank you for sharing that with me... and sent these beautiful photos of Local Farm

Saturday, June 11, 2011

Our Eggs-Perience

Some of us came because our parents brought us.
Some of us came because we felt that as meat eaters, we should be able to take a life for our food.
Some of us came in support of our partners.
Some of us came to share our homesteading skills.
Some of us came to learn about housing options for, and care of laying hens.
Some of us came because we want to raise meat birds and wanted to see how our children would handle their harvest.
Some of us came because we raise laying hens and want to be prepared for the day they get old or injured.
Some of us came to bridge our suburban childhood to our partner's farm background.
Some of us came because as vegetarians we feel we must be fully responsible for any meat we eat.
ALL of us came to a deeper appreciation of our own lives, forged close bonds with each other, and went home richer in many ways besides the delicious bird we had prepared for a future meal.

Saturday, June 12, 2010

EGG-sperience Chickens


That yummy looking chicken on your dinner table? Did you ever wonder were it came from? Well we did and now we know.

First it's a little baby fuzz ball that comes in the mail. You can get mail order chicks from Murray McMurray and many other hatcheries The post office is always very eager to get them to you and will probably call repeatedly until you pick them up.
When you get them home you need to put them in a draft free box. They should have a light for warmth. Food can go on the floor for the first couple days. Water can go in jar lids. After about two days you'll need to start using feeders and waterers.
And in a few weeks they get big enough to go outside. Once they are ready to go outside there are many different styles of chicken coops to keep them in.
These are Buff Orpington pullets

and these are white broilers the same age.They are the same age but the broilers are much bigger then the layers because they are bred to grow big and fast. We would recommend that you raise a heritage breed like Kosher Kings. You can get Kosher Kings from Clearview Hatchery in PA 717-365-3234. The standard white broilers have all sorts of problems like they are prone to heart-attacks and leg issues.


If you don't like reading about slaughtering then don't read any farther.


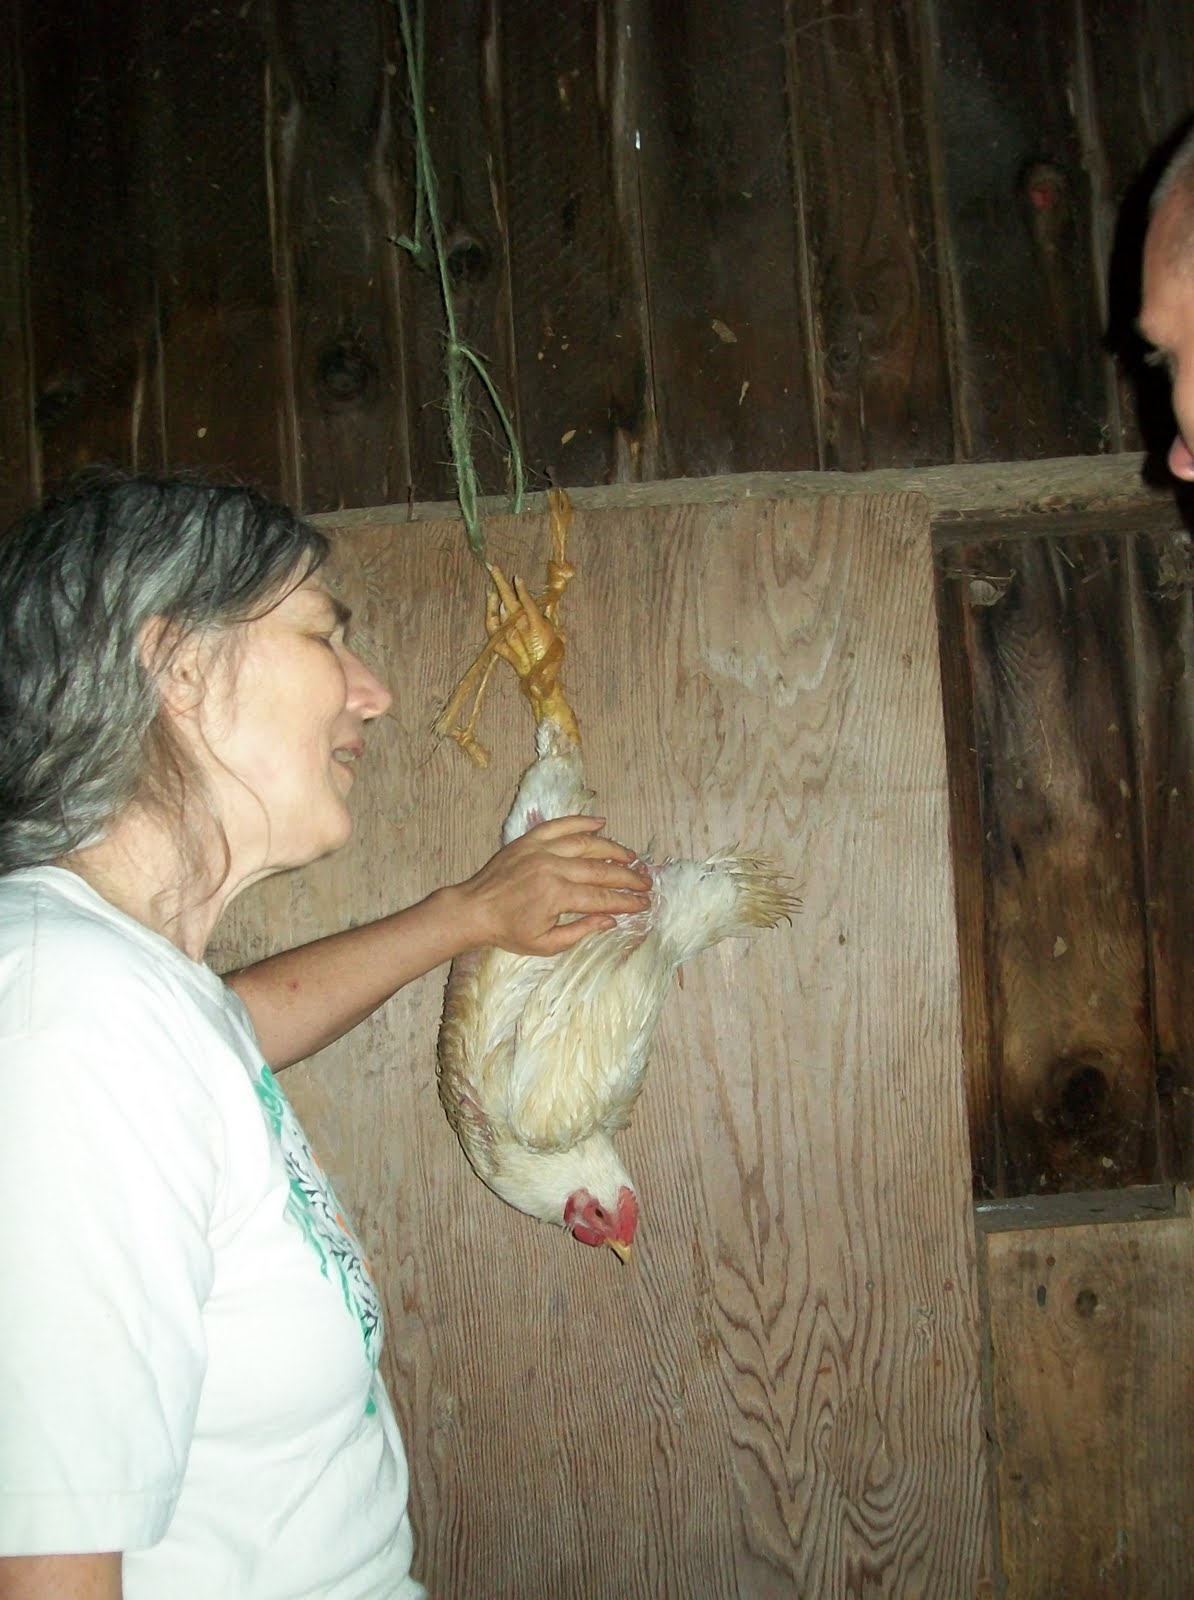
After we had walked around and seen the set up for the live chickens we got ready to kill, pluck, gut and dress. You shouldn't feed your chickens for 24 hours before hand. When you go to bring your bird to where you're going to kill it, pick it up by its feet so the blood goes to its head and it doesn't struggle.

Then you hang them up by the feet against a flat surface. Another way that works really well is an up-side-down old traffic cone with the end cut off.

First you open the beak and then you stick your knife up through the roof of the mouth and twist it. Then you slit the bird's throat and let it bleed out.

You need to hold the bird still after you have killed it until its death throws have stopped.
If you're using cones you don't need to worry about this.

Once the bird is dead it's time to pluck it.
We scald them first so the feathers come out easier (it also makes the bird stink wretchedly, but it really helps with the feathers so it's worth it). The water should be about 180F. It helps to put some dish soap in to break the natural waterproofing on the bird's feathers. They're done when you can pull tail and wing feathers out. If you scald them to long they start to cook and then the skin rips when you are plucking.


Now it is time to clean and dress them.

The first step is to take the head off.
You cut a ring around base of the head cutting through the muscles and tendons. Then you grab the head and twist it off. DO NOT try to cut the bone. It kills your knife.

Once the head is gone next comes the feet. You put the bird on its back. Then you take one of the legs and bend it backward so you can see the joint. You'll see two sets of two round lumps and you cut right in between them.
The joint will separate, so you don't need to cut the bone.


Next flip the bird back over onto its front. Then slit the skin on the neck starting from in between the wings.

Use your fingers to separate the skin and gland from the neck and then the glands from the skin.
Then you make another ring like the one you made to remove the head at the bottom of the neck. Once again NO CUTTING BONE. And break and twist the neck off.

While the bird is on its front it's time to remove the oil gland.
They are on top of the tail.

Now it is time open the cavity. Flip the bird onto its back. You make a small cut across horizontally and then use your fingers to finish it. Be careful not to cut the intestines. Then you cut down and around the anus in a horseshoe shape.
Next you reach in with two fingers and loosen every thing from the top of the cavity.
Once everything's free from the top you reach forward to the front of the cavity. You'll feel a small hard lump. It's the heart. Grab around it and pull.

Everything should come out.


After all the guts are out you can pick out and save the heart, liver and gizzard. When taking the liver remove the gall bladder. Do not break it!! It will taint the meat and make it bitter.

The only thing that won't come out are the lungs. You need to reach back in and get them. The lungs are attached in the front of the cavity on either side of the backbone. Use your fingers in a hooking motion and they should come out.

That should be everything, just check and make sure. Then hose the bird out well.

Keep the bird in you frig at least 24 hours before you cook it.

Yummy dinner!

Tuesday, July 28, 2009

Eggs-perience Chickens

For the most delicious chicken ever -- grow your own!

Debra Tyler led the Eggs-perience Chicken workshop at Local Farm in Cornwall CT. We learned how to feed, house, care for and slaughter chickens.

Feeding and Housing:
If you're starting from scratch, get metal containers. If you already have plastic bins be aware that they are not rat-proof. Choose your feed based on what you are raising. Broilers get a different ration than layers. Organic feed for all livestock can be purchased from Lightning Tree Farm, Millbrook, NY. They can be reached at 845-677-9507. Chickens are not, by nature, vegetarians. They'll eat grubs, insects, small rodents. The chickens will enjoy your food scraps - just don't give them any poultry or eggs. You'll need a dish for water and one for feed. They can be placed on the ground or hung from the "ceiling" of the coop. Feed twice a day, making sure your second feeding is well in advance of dark. Don't feed more than the chickens will eat or you'll just be attracting rats.

Debra has her chickens in chicken tractors. This portable shelter, from The Chicken Tractor book, is 10' long, 4' wide and 3' high. It will hold 10 hens. Made of 2x4's, plywood and chicken wire, it's lightweight and can be moved by one person. Cover 3 sides with a tarp to prevent raccoons from catching the chickens. Three nesting boxes fit across one end giving easy access to collect eggs and for cleaning. Put raccoon-proof latches on the top doors. Screw handles onto each end for ease of moving. Bed the nest boxes with hay or straw.

Electric mesh around your chicken tractor will protect it from raccoons, roaming dogs, etc. Premier http://www.premier1supplies.com is an excellent source for electric fence, chargers, and now sells chicken equipment as well. Also online is Gallagher Fencing. Local sources are Tractor Supply, Agway. Electric mesh fence is easy to install and easy to move. You will need to ground your charger -- you can use a coil of wire laying on the ground, or a metal rod driven into the ground. Debra uses a crowbar driven into the ground. Your mesh will work better if you mow/weed whack the area before you put up the mesh.
To electrify your chicken area you will need: electric mesh, a charger (solar or plug-in), wire to connect the mesh to the charger and the charger to the ground rod, and a ground rod or coil of wire if you're area is wet enough. A fence tester is recommended to ensure your fence is working and carries enough charge.

Chickens come in a wide variety of sizes and colors. They can be purchased as chicks from http://www.privetthatchery.com/ , Clearview Hatchery and http://www.mcmurrayhatchery.com/ to name a few.

You can move the chicken tractor every day - the chickens will have mown the grass and fertilized it. Moving it every day increases the fertility of your field. Or you can leave it in place for 3 months, adding straw or hay to the entire 'floor' of the coop so the chickens aren't standing in mud. The layers of straw and manure build up and create a wonderful garden bed. Add a bit of soil, put in seeds of a light crop - like lettuce, and you have a new bed!

Another option for housing was a cattle panel turned into a hoop house. It's not as easy to move and you have to create a door to get to the birds.

Broilers are short-term birds, layers you'll keep for years. The layers begin producing eggs around six months of age. You may want to build a more substantial coop for your layers as you'll be keeping them through the winter. "Chicken Coops" by Judy Pangman has many wonderful coop designs.

Slaughtering
The broilers ready for slaughter had not had food for hours so they'd have empty bellies. They were all Cornish Kings purchased as chicks from Murray McMurray. A good-sized meat bird, they're ready in 8 weeks for slaughter.

After catching the bird, carry it by the legs with the head down to quiet it. It might squawk at first but it will settle down. Tie its legs together - another handy use for baling twine!

Hang the bird with its back against a wall. Have someone hold the wings -- they'll need to hold quite tightly. Or use a cone to hold the bird. Place something absorbent underneath like hay, straw, shavings, a bucket, to catch the blood. The blood or blood-soaked straw can be used as fertilizer.

To pith the bird: Hold the bird's head, open the mouth, insert a sharp knife with a narrow blade through the roof of the mouth and twist.
Take the neck skin below the jaw (visually its above the jaw now since the bird is upside-down) and pull it toward you, insert the knife in the neck and cut towards yourself -- severing the arteries. Hold the head back so the blood drains quickly. Once the blood has stopped draining it's time for scalding.
You'll have a pot of hot water (apx 180 degrees) at hand. Holding the bird by the legs, dunk the bird into the water. Swish it around. This will both clean the bird and loosen the feathers. Check the bird every 20 to 30 seconds by pulling on the wing feathers. When they come out with a tug, you're done.

Hang the bird by the feet again and remove the feathers. Handle the skin gently -- it will tear easily. Compost the feathers.

Now to dress the bird. Cut off the feet. Set them aside for scalding and removing the skin and toenails -- the feet can be added to the stock pot.

Cut the head off behind the jaw. Remove the neck glands. Loosen the crop and remove the neck. Set it aside for the stock pot as well. Remove the oil gland at the top of the tail and toss it in the gut bucket.

Then cut under the tail, cut around the vent, preserving the tube and remove it along with the guts of the chicken. Toss into the gut bucket. Let liquid drain if necessary. Sweep the membranes out and into the gut bucket they go. Save the heart and liver.


Hose the bird well with cold water. An outdoor sink is nice if you have one.

Now bag the bird. Put the parts you're saving into the cavity and close the bag. Put the bird in the refrigerator and let it rest for a day before cooking.

We roasted our bird and it was delicious! Garlic bulbs under skin, olive oil and thyme on the skin. Tender, juicy, so good! Even old birds are good -- they have more flavor than 8 week old ones. It will be tougher, necessitating longer cooking. Crock pots and other slow cook methods are ideal.

Keeping chickens requires less space than I had thought and slaughtering is less messy and less difficult than I expected. Now to start on our chicken coop .... there are chickens in the future for us!